Pin Vise Hand Drill Bits(20PCS), Micro Mini Twist Drill Bits Set with Precision Hand Pin Vise Rotary Tools for Wood, Jewelry, Plastic etc (0.6-3.0mm)
Below are the top discussions from Reddit that mention this Amazon listing.
Tools & Home Improvement Power & Hand Tools Hand Tools Vises Pin Vises
- 【Hand Pin Vise】- Aluminium alloy pin vise with 20 pcs HSS twist drill bit, made of strongly materials offers superior performance and easy to use.
- 【3 Jaw Chuck Design】- Easily rotate vise head to clamp the drill bit in 0.6 - 3.0mm. Precise designed chuck to keep that drill upright.
- 【Extremely Versatile】- The vise drill is Includes 1 piece of hand drill and 20 pieces of twist drill bits in 12 different sizes to satisfy all you demand.
- 【Multipurpose】- Perfect for wood, also for plastic, walnut, amber, beads, beeswax, olive nut, small model kit etc.
- 【Not Only A Drill Tool】 - Pin vise able to clamp steel line and twist it into the shape you need, and also useful for electronic assembling, tool-making, model making and DIY.
Reddazon may receive an affiliate commission if you make purchases on Amazon.com through this site. Thank you for using these links to support Reddazon.
Werkzeug
Reddit Posts and Comments
0 posts • 38 mentions • top 32 shown below
3 points • persephon3
Not OP, but you can use a small hand drill like this to make holes for the jump rings!
2 points • Nemo_Griff
Oopsie! I saw your question but I was working on something that became complicated and I forgot to reply.
This is a pin vise. It can be used to hold small drill bits and it works well to hold onto lock pins as well to do some fancy stuffs.
2 points • WasBrunoMarsIsGay
I want to shout out a "pin" drill set, which is what I ended up using to fix this kind of breakage on a couple of kits. This is the one I got, although I dunno if there are better options.
Basically it's a teeny tiny drill you can use to drill holes into breakages like this. I've been using bits that are basically the same size as either a metal pin or a piece of paperclip (depends on how big the piece is). Sounds crazy, but bridging the pieces together with metal & Gorilla Glue is what let me fix similar issues. You would need the pin drill set, glue, pliers, and something to use to cut your metal with (I just used tin snips). Definitely not for everyone, but might be worth a look if you wanna salvage the kit.
The other way to go is to make the damage intentional and make a battle damaged version of the kit, which can be fun :)
2 points • IndraSun
https://www.amazon.com/dp/B07FJ6VD2P/ref=cm_sw_r_apa_i_fpnPEb3MDPVK2
12 bucks.
Then eBay n52 rare earth magnets, buy a couple of different sizes, win. I'll go find a ruler and figure out best size for you.
2 points • automaticfailure
Try this: https://www.amazon.com/Pin-Vise-Precision-Jewelry-0-6-3-0mm/dp/B07FJ6VD2P/ref=sr_1_5?dchild=1&keywords=1mm+drill+bit&qid=1587047897&sr=8-5
.6mm to 3.0mm
Smaller diameter wire would probably work too. Try 28g as anything smaller may just be more hassle than it's worth.
1 points • _Myst_0
This is the one I use, but there’s a few others available for a bit cheaper. https://www.amazon.com/Pin-Vise-Precision-Jewelry-0-6-3-0mm/dp/B07FJ6VD2P/ref=mp_s_a_1_3?keywords=pin+vise&qid=1584240037&sr=8-3
1 points • DOC_POD
I'm not sure what you use for drilling, but I use a pin vise, which came with a bunch of different sized bits. The one I use most often is roughly the same size as a paper clip, which is honestly what I use for most pinning (since it is something I don't have to do very often). So how I would do it is drill a hole in the base, and a hole up into one foot, then glue the wire (ie. piece of paper clip) into the hole in the foot, then insert into the hole in the base (with glue). Once dry, snip any excess wire that protrudes too far out of the bottom of the base.
This is the pin vise I have: Pin Vise on Amazon
1 points • Monatigo
I bought this recently on Amazon, and it works really well. You can easily feel when it drills through the base and into the mini, so you shouldn't have an issue with drilling through the mini
Pin Vise Hand Drill Bits(20PCS), Micro Mini Twist Drill Bits Set with Precision Hand Pin Vise Rotary Tools for Wood, Jewelry, Plastic etc (0.6-3.0mm) https://www.amazon.com/dp/B07FJ6VD2P/ref=cm_sw_r_sms_apa_i_7NHjEbZTNSAVY
3 points • droober86
get a drill. youll probably end up just butchering it if you try with a knife. This is a solid option: https://www.amazon.com/dp/B07FJ6VD2P/ref=cm_sw_r_tw_dp_U_x_ftmJEbWFEMWEG
1 points • themalorkus
This is similar to what I have and it works pretty good: https://www.amazon.com/dp/B07FJ6VD2P/ref=cm_sw_r_sms_awdb_t1_crMjEbC1C4RN7
1 points • TXshield9
Pin Vise Hand Drill Bits(20PCS),... https://www.amazon.com/dp/B07FJ6VD2P?ref=ppx_pop_mob_ap_share
Yep, just drill a couple mm for the barrels and it totally changes the look.
1 points • pdb1975
You'll need to carefully carve and sand away the cast on details, drill the shell for the mounting pins, and then use a CA adhesive to glue the pins into the holes.
You should touch up the paint after you remove the details. Don't worry if the paint isn't a perfect match, a little bit of weathering will blend it visually. Also make a paper template for the pin holes, and use a manual pin vise style drill (like this guy) and not an electric drill. Obviously you'll have to have the cut lever inserted through the pins before you glue the pins in.
Good luck!
1 points • arctic-apis
https://www.amazon.com/gp/product/B07FJ6VD2P/ref=ppx_yo_dt_b_asin_title_o04_s00?ie=UTF8&psc=1
4 points • ParaplegicParkour
I think it’s totally worth it to magnetize vehicles and elite choices, but not troops. That said I did find it worthwhile to magnetize the wrists on my intercessor sergeants so I can swap out their melee weapons - but that was a grand total of 4 models and was not difficult since they’re a bit chonky. If you were to do the same on something like fire warriors, I’d recommend doing it at the shoulder just so you have enough space.
Get yourself a pin vise (a small hobby hand drill) which will come with drill bits. You’ll also need the correct size magnets and some superglue (I like the thin stuff for this, but gel would probably work fine). All-in I’d say your looking at $30 for enough materials to magnetize at least two entire armies (if you get what I got).
My process is to dry fit the weapon on the model to eyeball where I should put the magnet. I drill the hole in the weapon in an unobtrusive spot where it will touch the model and be hidden from view. A drop of super glue in the hole and then I use the blade of my hobby knife to place a magnet in the hole, flush with the surface (I put the magnet on the flat of the blade near the tip, put it in the hole, and then slide the knife away horizontally so the edge of the hole prevents it from coming away with the knife - don’t pull up or the magnet will just stay with the blade).
Then I give that a minute to dry and drop another magnet on top of the one I just installed and make a dot on top of the new magnet with a marker. This ensures that I have the polarity correct - doing so is critical.
I then drill a hole on the model that corresponds as closely to where it will line up with the gun as possible (“close” counts in horseshoes, hand grenades, and magnets). I put a drop of glue in the new hole, slide the blade of my knife between the two magnets and lift the marked one away, and then place it MARKED SIDE DOWN into the new hole using the same process. Once it dries, voila.
—The drill set I bought was:
Pin Vise Hand Drill Bits(20PCS), Micro Mini Twist Drill Bits Set with Precision Hand Pin Vise Rotary Tools for Wood, Jewelry, Plastic etc (0.6-3.0mm) https://www.amazon.com/dp/B07FJ6VD2P/ref=cm_sw_r_cp_api_fabt1_IY-WFbT5Y3QJ7?_encoding=UTF8&psc=1
—For infantry and small weapons on vehicles, I used these (looks to be out of stock but 1/16 x 1/32 inch and came with a drill bit for ease of use):
MagNetSol Magnets + Drill Bits Combo Pack (100pcs 1/16 x 1/32 inches Magnets + 1pcs 1/16 Drill Bits) https://www.amazon.com/dp/B074SYK3H4/ref=cm_sw_r_cp_api_fabt1_uX-WFbZV7DA4B?_encoding=UTF8&psc=1
—I found 3x5mm magnets to work well for large vehicles bits. The pin vise I bought did not have a bit this size with it, but it’s a common enough size that if you own a power drill, you probably have it (or just buy the correct metric bit at the hardware store):
Fine Clutter Brushed Nickel Pawn Style Fridge Magnets, Office Magnets, Dry Erase Board Magnets, Refrigerator Magnets, Whiteboard, Map, Magnetic Pins (Pack of 30) (Disc, Silver) https://www.amazon.com/dp/B01M0XJD3O/ref=cm_sw_r_cp_api_fabt1_mV-WFb7RM60QT?_encoding=UTF8&psc=1
2 points • bolterbot
DRILL YOUR BOLTER, BROTHER!
Buy a pin vise set on:
Amazon.com
Amazon.ca
1 points • moonriddim
i found one on etsy, but i didn't look too hard. i'd say look there, as a lot of people selling molds on there hand make the molds. as for drills, i've heard hand drills are awesome for putting holes in resin after its cured. i've seen a lot of people use them for keychains. you can find them on amazon, or i'd imagine you'd be able to find them at your local hardware store!
1 points • CheapScotch
Oh yeah, I forgot about the screws, I almost lost one too but managed to find in on the floor. I used this drill to drill holes where the welds had been and then these screws to put mine back together.
2 points • smitty22
Yup.
A mould line remover or the back of your hobby knife, if you don't mind the risk of being self-stabby will help, and is best done before gluing.
A Pin Vice will let you drill the barrel and that just really makes it go from a toy to a model.
A good pre-made tool kit can be found in the Gundam Took Kits.
1 points • hmmpainter
You should just pin it. It's pretty easy to do and will give you the best results.
Get a drill like this: https://www.amazon.com/Pin-Vise-Precision-Jewelry-0-6-3-0mm/dp/B07FJ6VD2P/ref=sr_1_1?dchild=1&keywords=miniature+drill&qid=1587438055&sr=8-1
Also get a paper clip, and something to clip the paper clips e.g. the wire cutting edges on a pair of needle nose pliers.
Drill a hole in each of the back hooves with a drill bit approx. the width of the paper clip. Cut off two lengths of wire from the paper clip and super glue them into the hooves. Then drill corresponding holes in the base. Stick the protruding wire from each hoof through the corresponding holes and watch in amazement as your antelope stands proudly erect on its own. Trim any excess wire sticking out of the base. Once you've posed him to perfection, put super glue in the holes in the base to secure the wire.
3 points • junipertreebush
Almost all of my Custodes are fully magnetized. I use 2x2mm for heads and 2x3mm for arms. The idea started when I wanted my first set of Wardens to double as Sagittarum.
If you want to magnetize I would recommend getting a hand drill from Hobby Lobby or this one from Amazon. Not the Games Workshop one as common feedback on reddit is that the vice will often not hold the drill bit at a perfect center. You may need to buy additional drill bits if you decide to get the one from Hobby Lobby.
​
- Start by scoring the plastic with an Exacto blade in an X pattern. You are trying to mark the center of the surface you are going to drill. Use the tip to push into the true center which may be outside of your X.
- Place a smaller drillbit into this pushed divot using it as a guide, figure out the angle you want to be using, and start drilling. Work your way up to whatever size magnet you want be using. By doing it in stages you can correct being off center in either angle or positioning.
- Take your Exacto blade and score the inside of the drilled surface to create channels for superglue to lay in. Carefully apply a small amount of superglue to these channels and quickly push a magnet in.
A few other tips:
- Buy a bottle of Tamiya, use about 1/3 for model assembly and dump extra parts of sprues in there. This "grey goo" becomes a very good way to fill seams between two parts. Think the junction on Warden Robes. You can use this inside the drilled hole if you accidentally made the hole too big for the magnet. I also apply a very thin layer of this on top of the magnet after step 3 but before painting.
- Take a sharpie and mark one side of the magnet daisy chain. Always insert the nonmarked side of the magnets in while gluing. This is an easy way to make sure all magnet's orientations and polarizations are the same across your entire army.
1 points • Cayles_
I ended up fixing this. I bought a mini drill bit from amazon like someone recommended. Since I only needed to make the hole deeper I used a drill bit that wouldn’t mess with the width. The one I bought comes with 20 different size bits.
https://imgur.com/gallery/Fdx4UIP
https://www.amazon.com/dp/B07FJ6VD2P/ref=cm_sw_r_cp_api_i_.sAjFbQXZ131V
1 points • almightywhacko
The safest way to remove it would be to get a pin vise and drill it out by hand.
https://www.amazon.com/Pin-Vise-Precision-Jewelry-0-6-3-0mm/dp/B07FJ6VD2P
You might also be able to screw a small self-tapping screw into the broken end and then use the screw to pull out the remainder of the peg. However inserting the screw will cause the peg to expand a bit which could stress the hole and make the peg harder to pull out.
Something like these:
https://www.amazon.com/HanTof-Phillips-Rounded-Tapping-Assortment/dp/B07GB4TWHW
1 points • gwarsh41
a basic pin vice kit like this one is a great place to start. Paper clips are a great thing to use for pin rods, no need to waste money on brass ones from a hobby shop.
If you ever do pewter, or just want crazy drills these tungsten ones are brittle, and will break with too much pressure (the super thin ones), but holy cow they get the job done once you learn to use them.
1 points • TheGoldenPotty
You bet - https://youtu.be/wbBK5AzjOE8
Edit: while I hesitate to recommend anything off of Amazon, this is the stuff I used for magnetizing
Magnets - Deryun Magnet 250 PCS 2x1mm... https://www.amazon.com/dp/B07BHF3X86?ref=ppx_pop_mob_ap_share
Drill thingy - Pin Vise Hand Drill Bits(20PCS),... https://www.amazon.com/dp/B07FJ6VD2P?ref=ppx_pop_mob_ap_share
1 points • begleysm
I haven't done skaven, I've done Chaos Warriors.
Make sure you get N52 Neodymium Magnets. I recommend buying 3mm x 1mm and 2mn x 1mm magnets. Get a Pin Vise set off Amazon with a 3mm and a 2mm bit.
I've had a good experience with the delivery time and products from JC Magnetics on eBay.
3mm x 1mm: https://www.ebay.com/itm/50-100-1000pcs-3mm-x-1mm-1-8-x1-32-N52-Rare-Earth-Neodymium-Crafts-Magnet-Disc-/292097556499?nav=SEARCH
2mm x 1mm: https://www.ebay.com/itm/50-100-1000pcs-2mm-x-1mm-5-64-x1-32-N52-Rare-Earth-Neodymium-Crafts-Magnet-Disc-/293326309813?nav=SEARCH
Pin Vise: https://www.amazon.com/Pin-Vise-Precision-Jewelry-0-6-3-0mm/dp/B07FJ6VD2P
1 points • nerdyogre254
It's pretty good mate, I'll run through a list of things that you can do to improve it a bit.
-
Can you see how the top part of the hull doesn't stick well to the sides? Not your fault - the mould that they use to create the Rhino chassis is old as fuck. For the next one you build, grab some rubber bands and when you glue the body together, wrap the rubber bands around it and leave it for maybe a day or so. Kind of like this: https://imgur.com/r/Warhammer40k/zflzG
-
Drilling your gun barrels: do you have a Pin Vise? I would recommend getting one if you don't already and drilling out the barrels on your storm bolter, lascannon, and the exhaust pipe end as well. Here's a video that's useful for getting started with it
1 points • psxndc
2mm ball bearings and I use a 1.9mm bit on the hand drill.
Awl is a 3 and 1/2 inch Klein tools awl.
0 points • frostape
Pin Vise: https://www.amazon.com/Pin-Vise-Precision-Jewelry-0-6-3-0mm/dp/B07FJ6VD2P
Magnets (3x1mm): https://www.amazon.com/gp/aw/d/B084NZVDQ3
Edit: Who downvoted this? Lol
1 points • Acidraindancer
I am going to be trying to make onenote of the items below
https://www.amazon.com/gp/aw/d/B07FJ6VD2P?psc=1&ref=ppx_pop_mob_b_asin_title
https://www.amazon.com/gp/aw/d/B077K5Z2Z8?psc=1&ref=ppx_pop_mob_b_asin_title
https://www.amazon.com/gp/aw/d/B07CPLGV8P?psc=1&ref=ppx_pop_mob_b_asin_title
https://www.amazon.com/gp/aw/d/B0013UDWXI?psc=1&ref=ppx_pop_mob_b_asin_title
https://www.amazon.com/gp/aw/d/B00MG5PYPI?psc=1&ref=ppx_pop_mob_b_asin_title
1 points • z2amiller
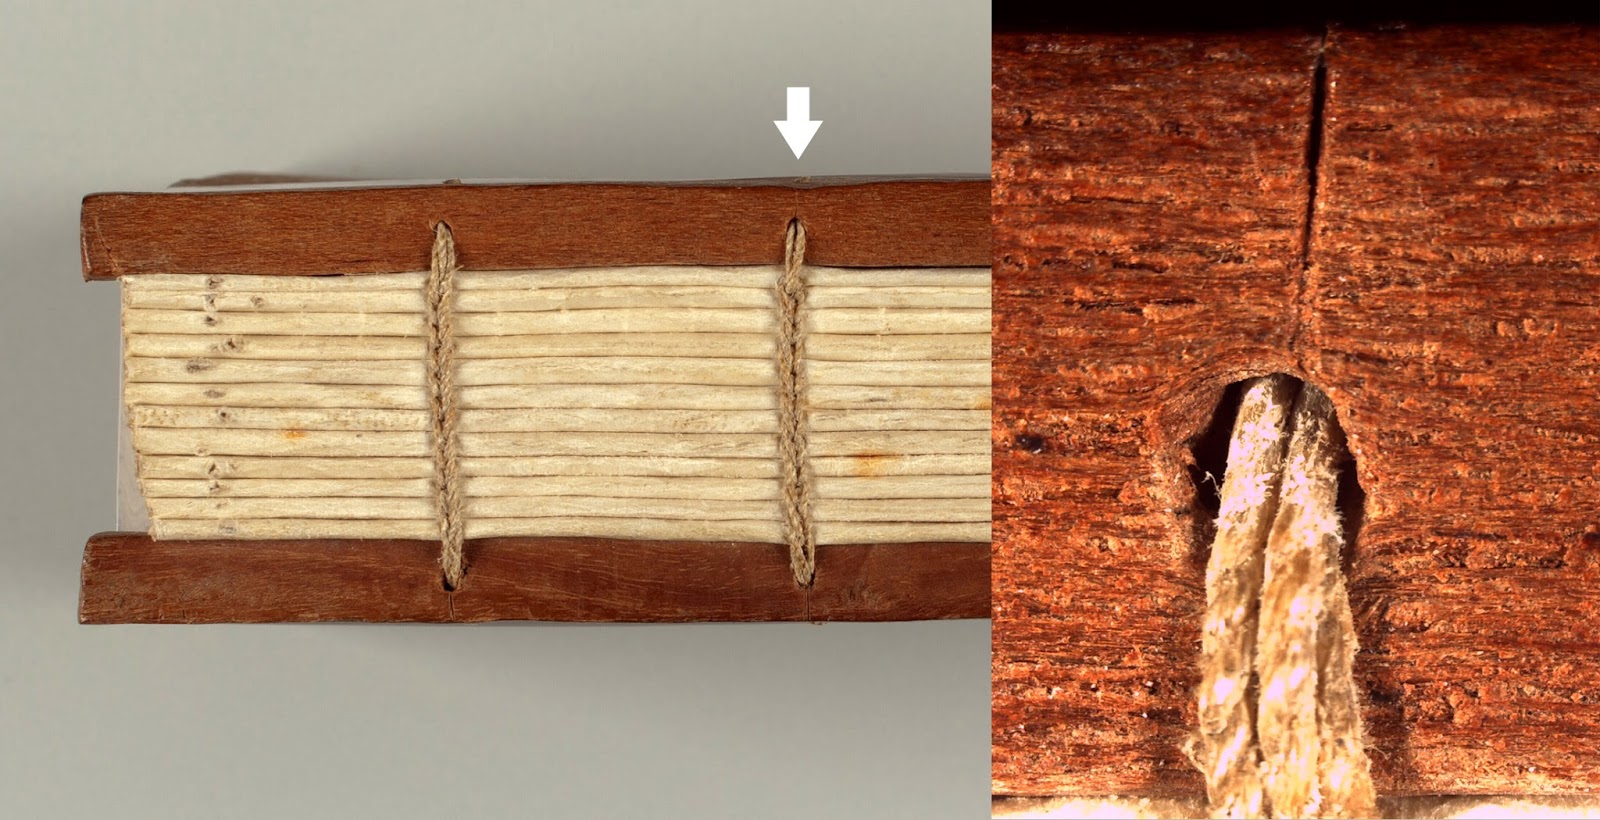
I bought some thin hardwood covers from Ocooch hardwoods in the US. I bought 3/16th board which seemed to be a good thickness for the book I was making -- approximately A4 size. I've created books using poplar (cheap, in case I screwed it up since it was my first time) and I've also bought some cherry and walnut for future projects.
I used a pin vise to drill holes. I did an Ethiopian style binding - here's a Side view, a diagram, and a view of the holes in my actual build.
I finished with some linseed oil/varnish oil. I really like Tried and True varnish oil. It is totally nontoxic and even smells pretty nice. It takes kind of a long time to get a good finish with oil, but it's not a lot of "active" time, just a bunch of days in a row of waiting \~24 hours between coats. The actual oiling only takes a few minutes.
Here's a picture of a poplar board cover of the build in progress. I obviously need a lot more practice with my woodworking skill. I regret not getting more progress pictures, and I'm sad that I didn't take a picture of the finished product before shipping it off (it was a gift!)